 Here is the first picture completed. When I decided to do this project. Did you ever go through the process in your head and say oh, I not only can do this but it will be a fast project. For me, wrong. I do not mind this because I am happy with the results. The reason why I mention this is that someone once told me when you start a painting not to leave it unfinished. You should finish it in the same day. I suppose it would depend on what kind of painting you are doing. Or,how good you are at it. Believe me she was and is very good and talented at her work. At any rate, if you ever see anyone's work at a fair etc. Even if you could do it, the question to keep in mind is will I? Do I have the time and desire for this? Because I realize my head thought is going to be faster in doing the project than actually working with the project. For me I am fine with the time it took. I took my time and it paid off. I think many of you creative people can relate. We all know practice makes perfect. I am not sticking to one thing meaning on one type of craft, so it might be a lot of trial and error pursuit. Instead of getting easier as you go along. And that's okay also because I expect this. So whatever you decide on the reason your doing it that should tell you what you want out of it. I hope this makes sense to you also... The velcro on this project gives the children an opportunity to roll the car's around with their hands. If you make this as a gift please place a card on the back of the mirror to remind them of age appropriate and discretion along with using their own good judgement if child is in need of more supervision of another. At any rate I thank you for checking in and hope you will give it a try. =p.
Monday, October 24, 2016
Here is the first picture completed. When I decided to do this project. Did you ever go through the process in your head and say oh, I not only can do this but it will be a fast project. For me, wrong. I do not mind this because I am happy with the results. The reason why I mention this is that someone once told me when you start a painting not to leave it unfinished. You should finish it in the same day. I suppose it would depend on what kind of painting you are doing. Or,how good you are at it. Believe me she was and is very good and talented at her work. At any rate, if you ever see anyone's work at a fair etc. Even if you could do it, the question to keep in mind is will I? Do I have the time and desire for this? Because I realize my head thought is going to be faster in doing the project than actually working with the project. For me I am fine with the time it took. I took my time and it paid off. I think many of you creative people can relate. We all know practice makes perfect. I am not sticking to one thing meaning on one type of craft, so it might be a lot of trial and error pursuit. Instead of getting easier as you go along. And that's okay also because I expect this. So whatever you decide on the reason your doing it that should tell you what you want out of it. I hope this makes sense to you also... The velcro on this project gives the children an opportunity to roll the car's around with their hands. If you make this as a gift please place a card on the back of the mirror to remind them of age appropriate and discretion along with using their own good judgement if child is in need of more supervision of another. At any rate I thank you for checking in and hope you will give it a try. =p.
Second finished picture of the" Children's Car Mirror Wall Hanging"
 Here is a craft I recently finished. In the project, I used velcro. I cut a small piece and placed the soft section under the car. The rough part of the velcro goes on the frame. When you look at this picture you might think that the inner edges are missed of painting that is supposed to be black. Believe it or not what it is, is the reflection of the wheels showing through the mirror and the angle I took the picture from.
Mirror frame for car's
 Here I used two coats of liquitex gesso on the frame. After I put the painter's tape around the mirror frame.
Mirror car project (black paint)
 You also will use black acrylic paint, to paint the frame of the mirror. This makes the color for the look of the car's being on the road. I used three coats of paint, letting each layer dry before painting another. Make sure you read the length of time to let each layer dry on the direction's. I know I had two acrylic different black paint bottles and surprisingly they both gave different times of drying time. I used the painter's tape on the inside of the frame, on the mirror so the paint would not be as messy to clean afterwards. To be clear, I still needed to touch up areas after I took the tape off. You can either use a small thin paintbrush, or possibly a black permanent marker to get the little crevices that were missed. Whatever works for you. :). Patience is required.L.O.L.

Saturday, October 22, 2016
Poem And Song To Five Little Pumpkin's
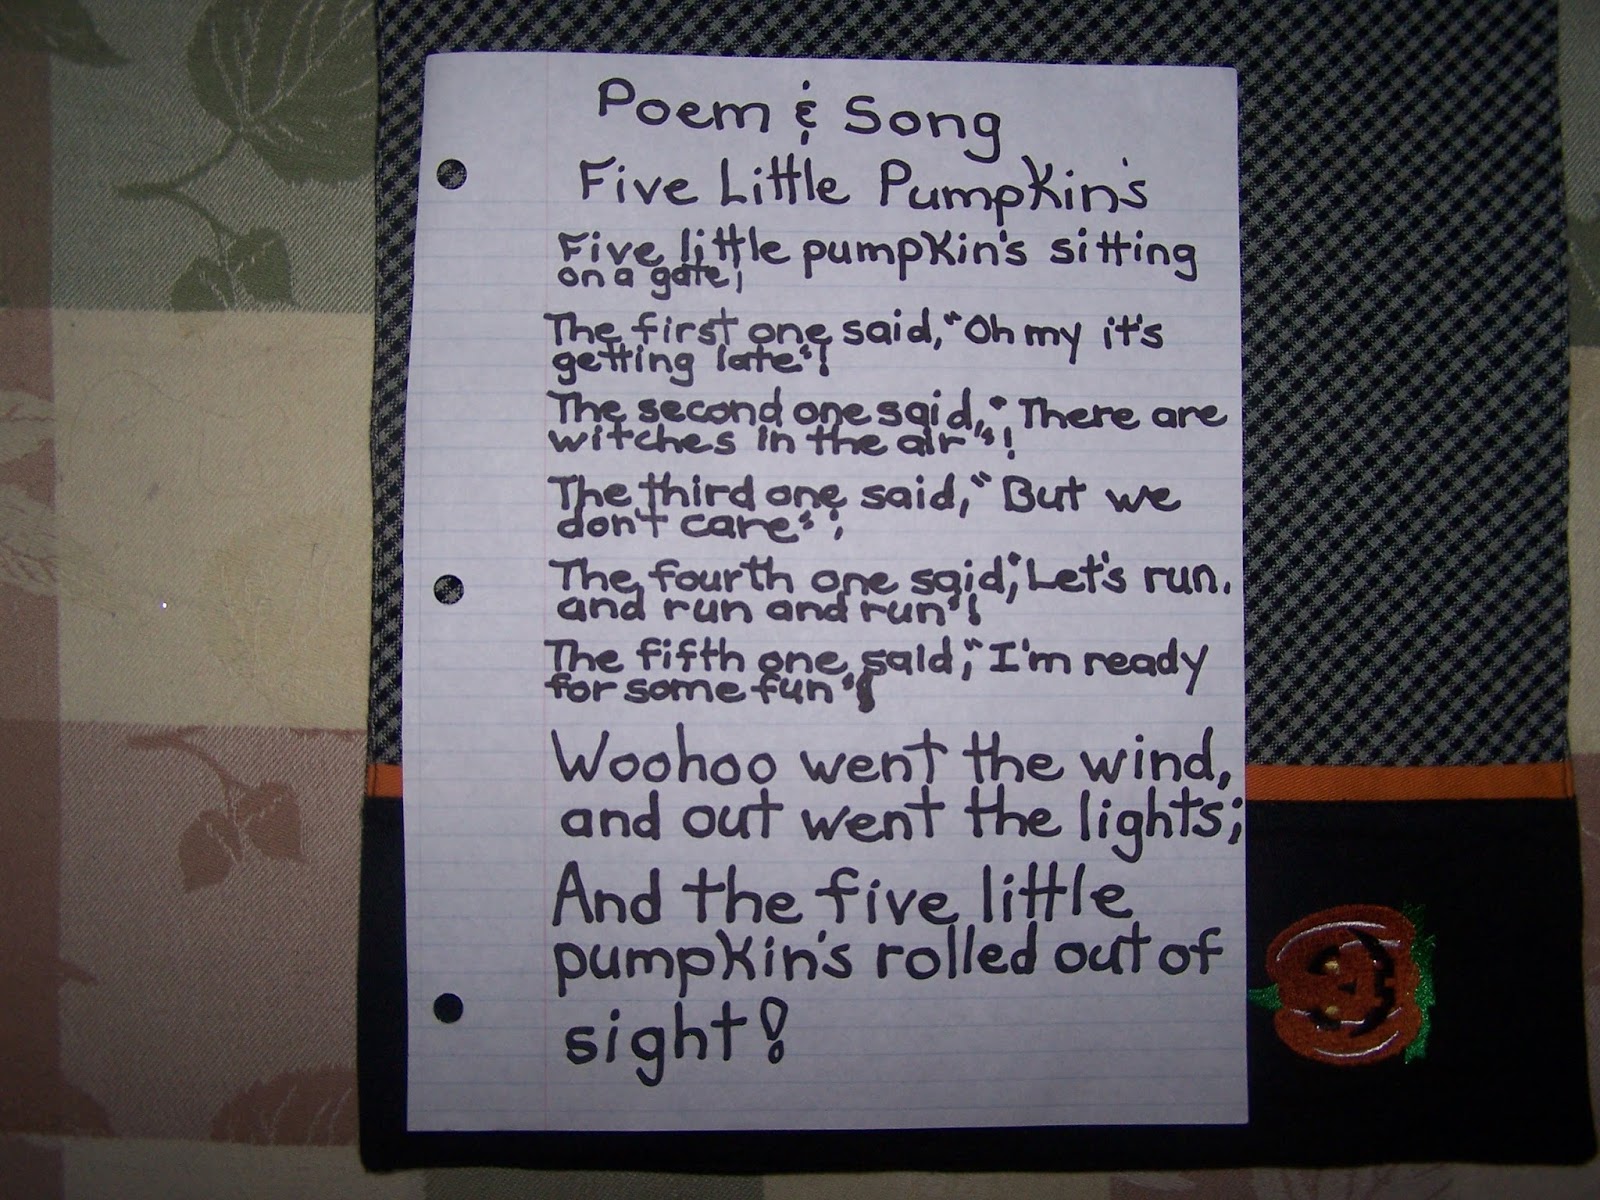 With this poem and song you can have the children take turns acting the phrases out. They can have a prop or hold one or even dress up like one. Depending how far you want to take it. When they get to the part where Whoo went the wind and out went the lights you could also choose someone to put on or off the lights at the given time. I have found kids to enjoy this song and play acting and we all had a lot of fun with it. Whether with a group of friends, school or Birthday party. Hope you will give it a whirl. :).Don't forget to press on the picture to see the words better.

Friday, October 21, 2016

Picture and Directions For Acorn Clip Holder
 Here is a little craft for the Fall, to hold your note pad. I made a pattern out of cardboard the shape of an acorn. traced it on my felt piece, took the cardboard and drew the top cap on it and traced the top cap to the orange felt piece. On the back of the glued acorn I traced a piece of paper and cut it out and glued this to the back of the acorn. The reason for this is so the backing will stick to the double sided tape. Have the children glue the face on let dry, and then put double sticky to the back of the finished acorn and stick it to the metal clip as well. Put a notepad of your choice on the clip and a pen to top it. Now you have a new little friend to help you with your reminders etc. Hope you will give it a go. :).
Tuesday, October 11, 2016
Ceramic Bats and Ceramic Jack-O-Lantern
 Here is a couple of ceramics I created. The bats I made one year one for each of my children. The Jack-O-Lantern you would think that it was simply painted in two colors and it is done. (wrong) This actually took some time to do. Inside is glazed and lighted. outside was painted dry brushed at different intervals. These were fun times that I took lessons with some family members that it made it that much more enjoyable. Some days have past, but the memories will always stay with me. :). Don't forget to click on the picture if you want to get a closer look.

Tuesday, October 4, 2016
Apple Crisp Recipe
 Every year at the beginning of October there is a farm near us called Water's Farm. They have hay rides and food tables to choose from Girl Scouts help the farm by selling sweets to choose from. They have an old barn with the History by also showing old and new pictures. They have Native American's showing how they made their tents and you can ask questions and even go in the tent and imagine yourself living in those times etc. This all to show the History and keep the farm going. Oh and yes this Apple Crisp recipe is from them. It is the best one I have ever tried. Hope you will have a chance to try it out. My oven usually cooks higher so if it say's to preheat to 375 degrees I do 350 degrees. So keep in mind how your oven works. I hope I covered all bases. =).
Picture of Ingredients For Apple Crisp

Apple Crisp Cooked And Ready To Serve 'Yum'!

Monday, October 3, 2016
Fall Place Setting '1'

Fall Place Setting '2'

Subscribe to:
Posts (Atom)